![]()
WEB700
Web Programming Foundations
Schedule Notes Resources Graded Work MyApps Instructions Vercel Guide Code examplesWEB700 Week 11 Notes
Data Persistence
“Data Persistence” (the ability to “persist” or “save” new, updated or deleted information) is a vital part of any web application project. For example, this could be registering new users, deleting users, updating profile information or payment data for users, viewing saved files or uploaded images, etc. etc. To truly create an “application” we must be able to work with (and persist) data.
Fortunately, there are many different database systems that we can leverage to accomplish this notion of “data persistence”. These range from powerful “relational” database systems, including: Microsoft SQL Server, Oracle, MySQL, PostgreSQL, and many others as well as “NoSQL” database systems such as Amazon’s DynamoDB, Azure Cosmos DB and MongoDB.
However, NoSQL database systems such as those mentioned above are beyond the scope of this course and we will instead focus on the popular relational database system: “PostgreSQL”. For more information on the differences between Relational database systems, and “NoSQL” database systems, please see: https://www.ibm.com/cloud/blog/sql-vs-nosql
PostgreSQL (Postgres)
From the PostgreSQL site, postgresql.org:
“PostgreSQL (also known as “Postgres”) is a powerful, open source object-relational database system. It has more than 15 years of active development and a proven architecture that has earned it a strong reputation for reliability, data integrity, and correctness. It runs on all major operating systems, including Linux, UNIX (AIX, BSD, HP-UX, SGI IRIX, macOS, Solaris, Tru64), and Windows. It is fully ACID compliant, has full support for foreign keys, joins, views, triggers, and stored procedures (in multiple languages). It includes most SQL:2008 data types, including INTEGER, NUMERIC, BOOLEAN, CHAR, VARCHAR, DATE, INTERVAL, and TIMESTAMP. It also supports storage of binary large objects, including pictures, sounds, or video. It has native programming interfaces for C/C++, Java, .Net, Perl, Python, Ruby, Tcl, ODBC, among others, and exceptional documentation.
This is a great choice for us for multiple reasons; it is open source, highly available, standards compliant and most importantly, works nicely with node.js.
To get started, proceed to https://neon.tech and click on the green button: “Sign in” and log in with your GitHub account. Once you’re logged in, follow the below steps to set up the database:
-
in the “Get started with Neon for Free” page, enter a value for project Name, ie: Seneca and Database Name, ie: SenecaDB (We can add more databases later)
-
Leave “region” as the default value and Click the Create Project Button.
-
At the next screen, you should see a dropdown with “psql” selected. Click this and choose Node.js instead
-
Next, click the eye icon to reveal your password (NOTE Also consider checking the “Pooled connection” checkbox if this app will be deployed in a serverless environment, such as Vercel)
-
Copy the PGHOST, PGDATABASE, PGUSER and PGPASSWORD values and click the “I’ll Do this Later” button
pgAdmin
Now that we have our brand new Postgres database created in Neon.tech, why don’t we try to connect to it using the most popular GUI tool for Postgres; pgAdmin. If you’re following along from the lab room, it should already be installed. However, if you’re configuring your home machine, you will need to download pgAdmin:
Once it is installed and you have opened the app, we need to configure it to connect to our database:
- Right Click on the “Servers” icon in the left pane (Under “Browser”) and select Create > Server
-
This will open the “Create - Server” Dialog window. Proceed to enter the following information about your Postgres Database on Neon.tech
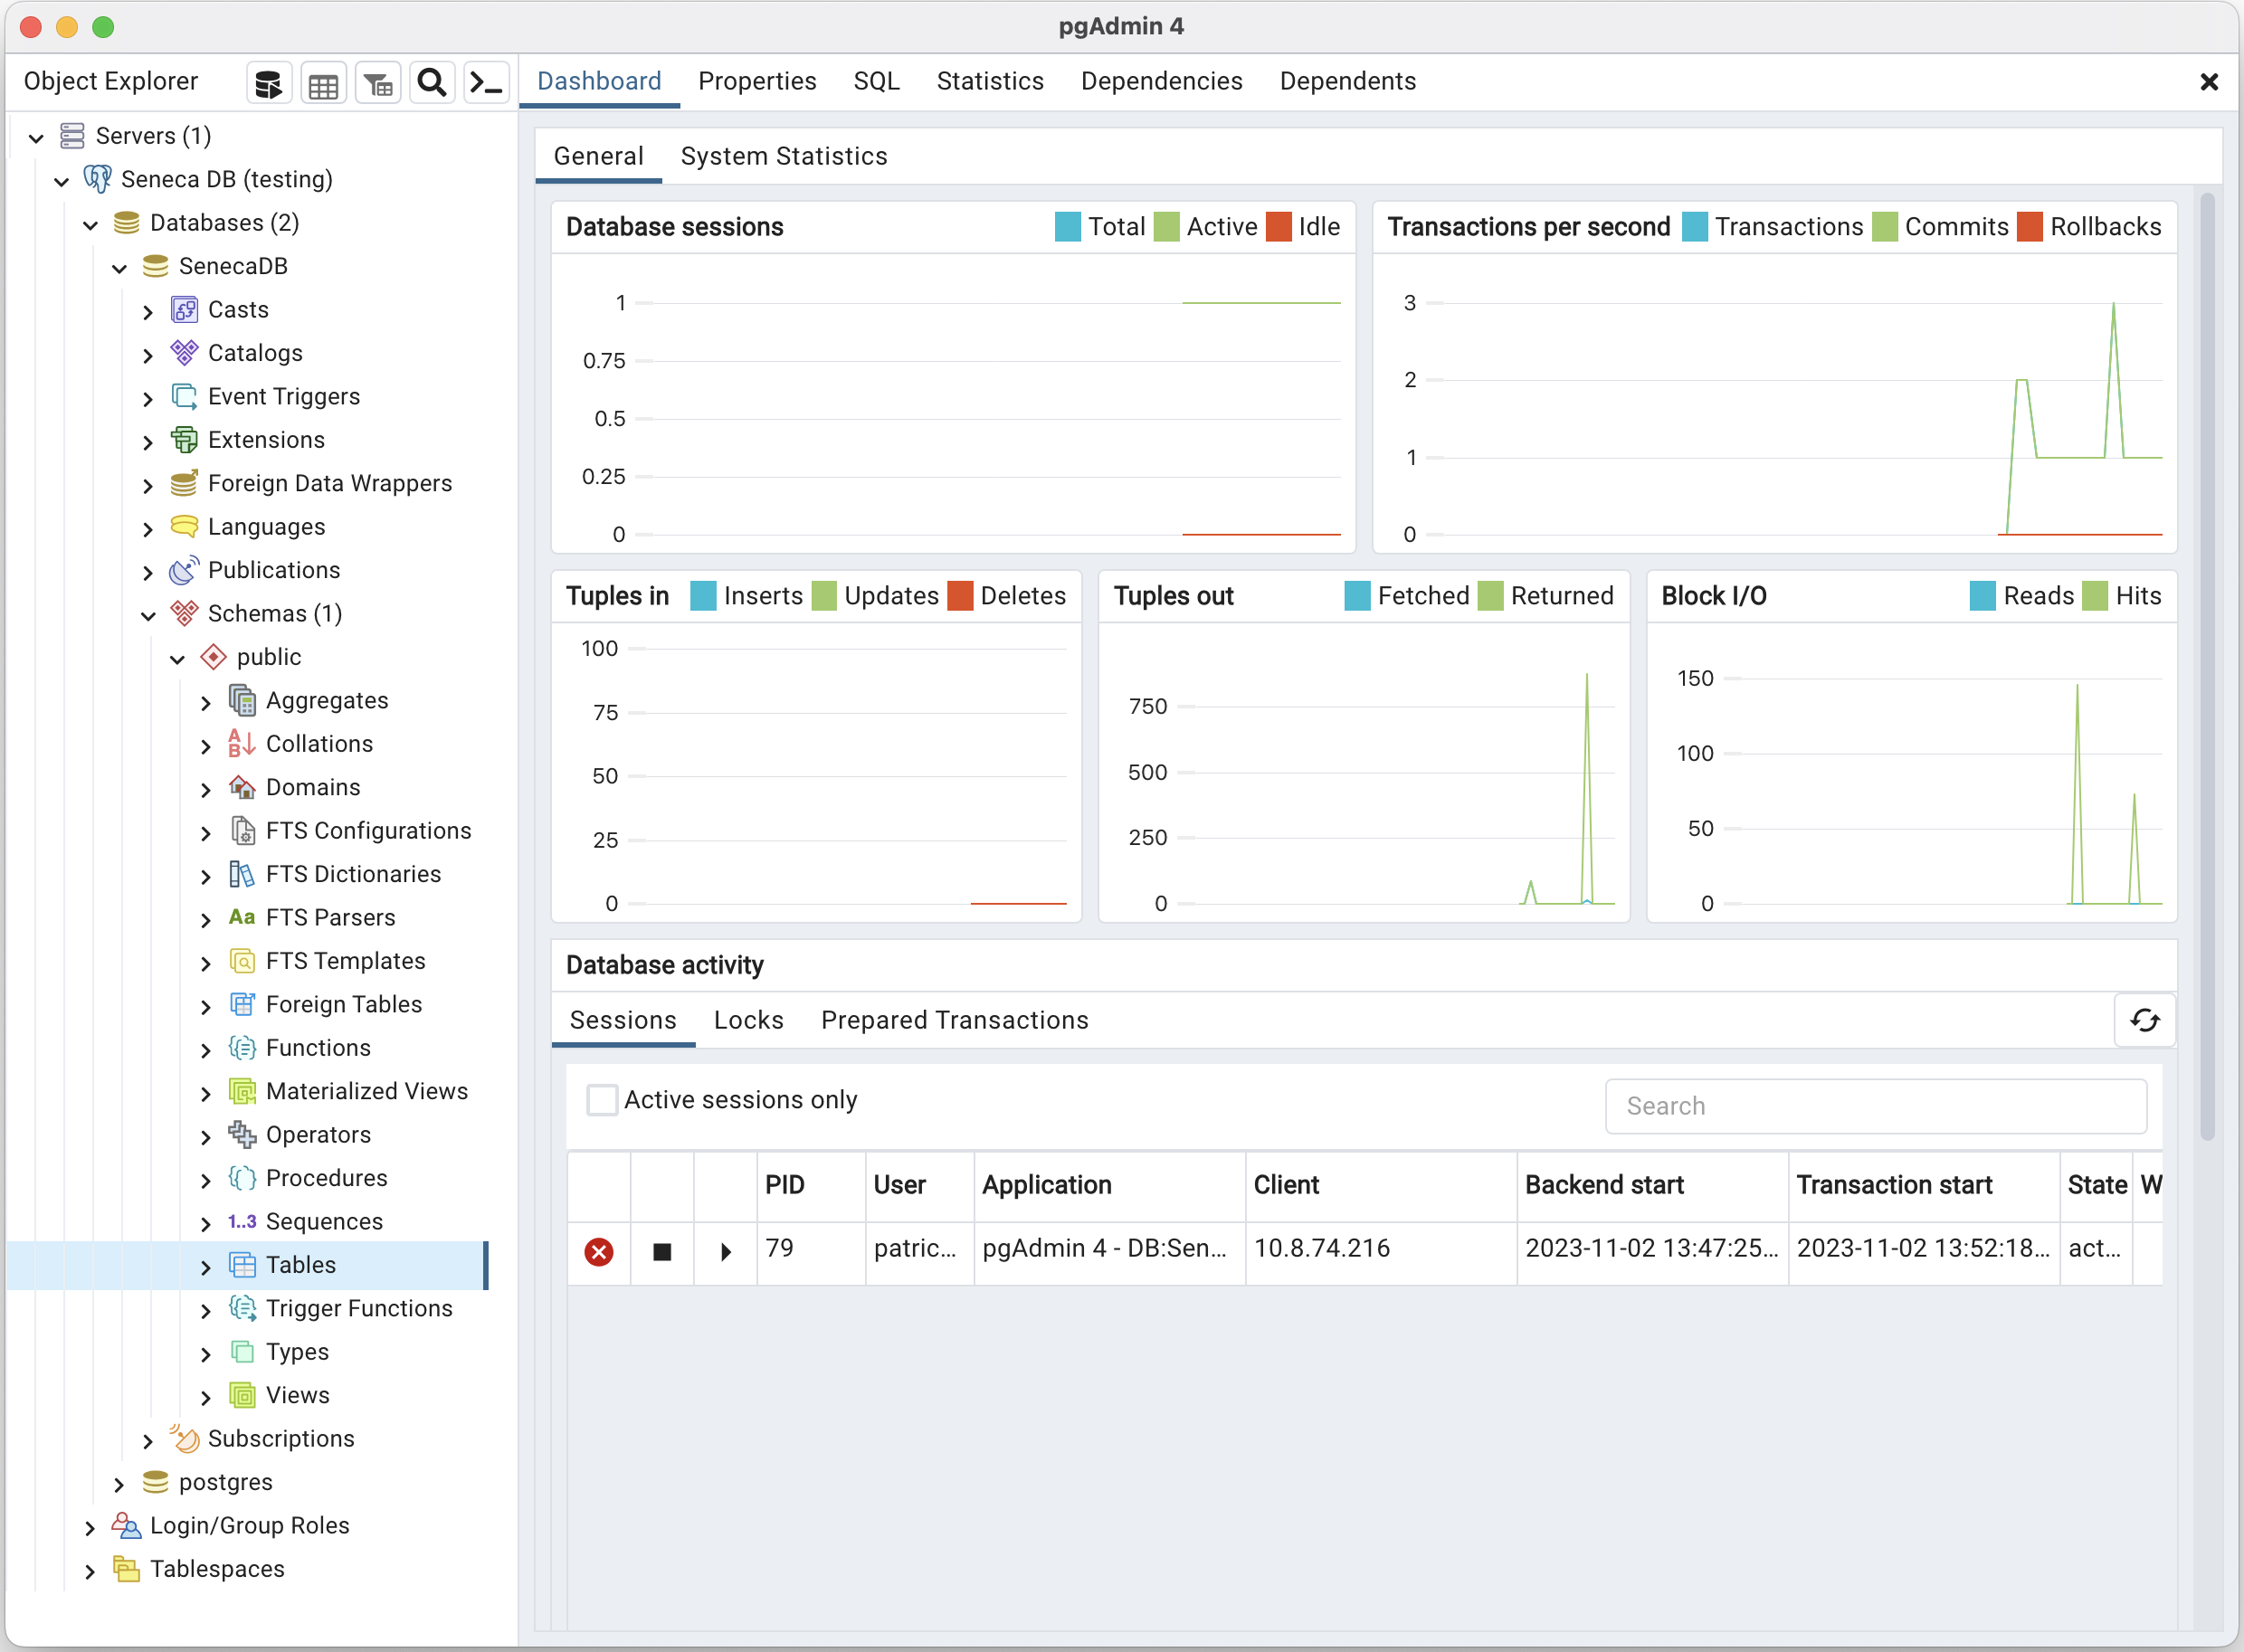
Field Value Name This can be anything you like, ie “Test Connection” (Connection Tab) Host This is the server for your Neon.tech Postgres DB (“PGHOST” value), ie: ab-cd-12345.us-east-2.aws.neon.tech (Connection Tab) Port This is the port for your Neon.tech Postgres DB - it should be the same as what’s already there, ie: 5432 (Connection Tab) Maintenance database Enter your “PGDATABASE” value here (Connection Tab) Username Enter your “PGUSER” value here (Connection Tab) Password Enter your “PGPASSWORD” value here Once you have entered all of your information, hit the “Save” button and click “Servers” in the left pane to expand your server connections. If you entered valid information for the above fields, you should see your Neon.tech Postgres DB Connection. Expand this item and the following “Databases (2)” item, and you should see your database. Expand this item, as well as the nested “Schemas (1)” item, followed by the “public” item, and you should be presented with something that looks like this:
Success! We will be keeping an eye on our data using this tool, so it is wise to have it running during development. Next, why don’t we see if we can get our node.js server to connect to the database as well? For us to be able to connect to a relational database, we will need to use an existing module. Fortunately, sequelize will do exactly what we want.
Sequelize
Like all modules in node.js, we will have to use Node Package Manager (npm) to acquire the module from the online package collection. With your application folder open in Visual Studio Code, open the integrated terminal and enter the command
npm install sequelize --save
followed by the command:
npm install pg pg-hstore --save
This will add both the sequelize and the pg / pg-hstore modules to our node_modules folder, as well as add their names & version numbers to our package.json file under “dependencies”.
Next, we need to update our server.js file to use the new modules so that we can test our connection to the database. If you’re working with an existing application, comment out any existing Express app code (routes, listen, etc.) that you have in server.js (for the time being) and add the following code:
const Sequelize = require('sequelize');

// set up sequelize to point to our postgres database
var sequelize = new Sequelize('database', 'user', 'password', {
    host: 'host',
    dialect: 'postgres',
    port: 5432,
    dialectOptions: {
        ssl: { rejectUnauthorized: false }
    },
    query:{ raw: true }
});

sequelize
    .authenticate()
    .then(function() {
        console.log('Connection has been established successfully.');
    })
    .catch(function(err) {
        console.log('Unable to connect to the database:', err);
    });
Where database is your “PGDATABASE” value, user is your “PGUSER” value, password is your “PGPASSWORD” and lastly, host will be your “PGHOST” url (ie: “ab-cd-12345.us-east-2.aws.neon.tech”).
Quick Note: If you wish to use “raw” with Joins / Eager Loading, place the
{raw: true}option on your individual queries (see the following issue here: https://github.com/sequelize/sequelize/issues/6408)
Once you have updated your app to use the Sequelize module, try running it using our usual “node server.js” command. If everything was entered correctly, you should see the following message in the console:
Executing (default): SELECT 1+1 AS result
Connection has been established successfully.
Finally, If you see any other errors at this point, go back and check that you have entered all of your credentials correctly when creating the sequelize object. Recall: You can use Ctrl + c to stop a node.js application from running.
Models (Tables) Introduction
Now that we have successfully tested the connection to our Postgres database from our node.js application, we must discuss what the Sequelize module does and how we will be using it to manage data persistence within our Postgres Database.
Sequelize is technically an Object-Relational Mapping (“ORM”) framework. It maps our JavaScript objects (“models”) to tables and rows within our database and will automatically execute relevant SQL commands on the database whenever data using our “models” (JavaScript objects) is updated. This saves us the trouble of manually writing complex SQL statements whenever we wish to update the back-end database to reflect changes made by the user. We can simply update our data and let Sequelize do the rest!
To see this in action, update your server.js file to use the following code:
const Sequelize = require('sequelize');

// set up sequelize to point to our postgres database
var sequelize = new Sequelize('database', 'user', 'password', {
    host: 'host',
    dialect: 'postgres',
    port: 5432,
    dialectOptions: {
        ssl: { rejectUnauthorized: false }
    },
    query:{ raw: true }
});

// Define a "Project" model

var Project = sequelize.define('Project', {
    title: Sequelize.STRING,
    description: Sequelize.TEXT
});

// synchronize the Database with our models and automatically add the
// table if it does not exist

sequelize.sync().then(function () {

    // create a new "Project" and add it to the database
    Project.create({
        title: 'Project1',
        description: 'First Project'
    }).then(function (project) {
        // you can now access the newly created Project via the variable project
        console.log("success!")
    }).catch(function (error) {
        console.log("something went wrong!");
    });
});
Once again, database is your randomly generated “User & Default database” value, user is also your randomly generated “User & Default database” value, password is your password and lastly, host will be your server url.
There is a lot going on in the above code - but before we walk through what everything is doing, try updating the above code with your database credentials and run it once again with node server.js. You should see the something very similar to the following output:
Executing (default): INSERT INTO "Projects" ("id","title","description","createdAt","updatedAt") VALUES (DEFAULT,'Project1','First Project','2017-02-28 22:45:25.163 +00:00','2017-02-28 22:45:25.163 +00:00') RETURNING \*;
success!
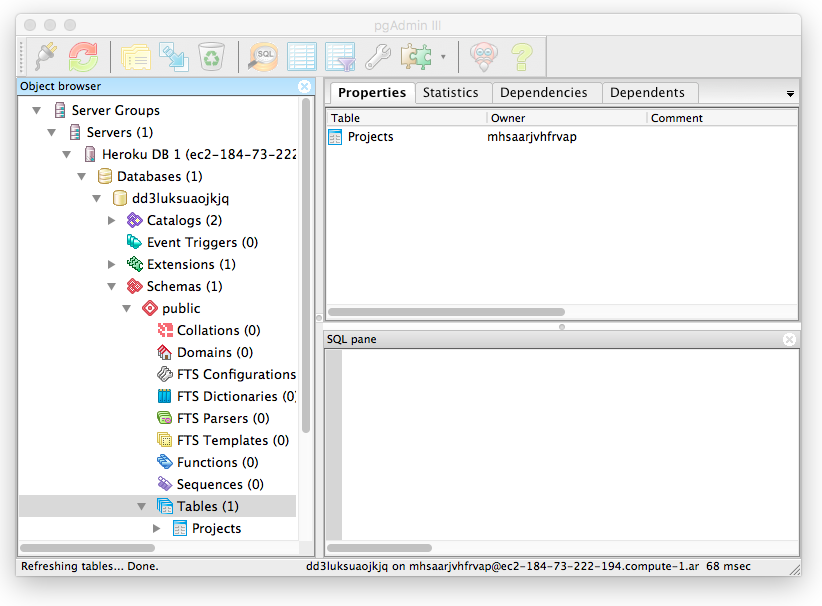
It appears that Sequelize has done some of the heavy lifting for us. To confirm that the create operation was successful and that we have indeed persisted “Project1” in a new “Project” table, go back to your pgAdmin application, right-click on “Tables (0)” and choose “Refresh”. You should now see our new “Projects” table in the list!
To view the contents of the table, right-click on the “Projects” table and select View Data > View Top 100 Rows. This will open a new window with a grid view that you can use to explore the data in the table:
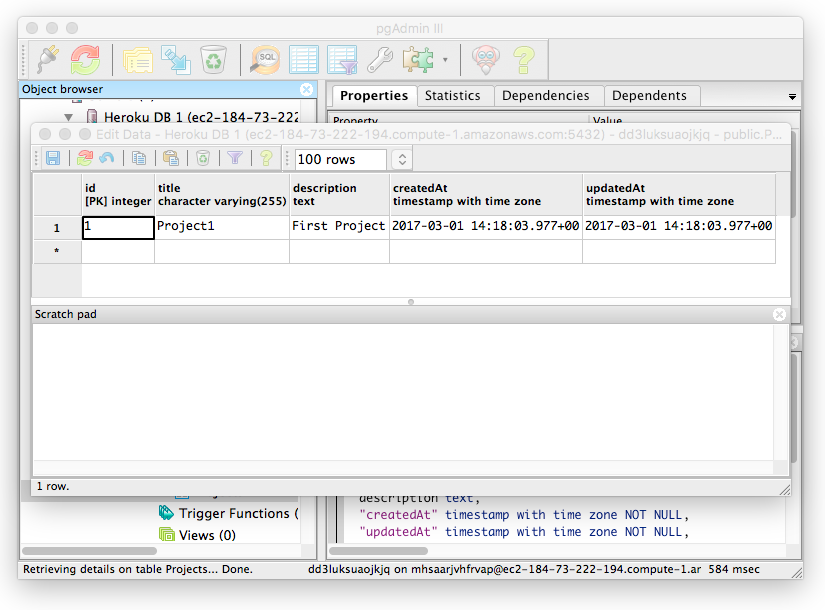
You will notice that there are some columns in the “Project” table that we didn’t define in our “Project” Model; specifically: id, createdAt and updatedAt; recall:
// Define a "Project" model

var Project = sequelize.define('Project', {
    title: Sequelize.STRING,
    description: Sequelize.TEXT
});
It follows that the title and description columns are there, but where did the others come from? The addition of the extra columns are actually added by default by the sequelize module. Whenever we “define” a new model, we automatically get id, createdAt and updatedAt and when we save data using this model, our data is automatically updated to include correct values for those fields. This is extremely handy, as we didn’t actually create our primary-key for the table! (sequelize went ahead and made “id” our primary key). Also, the createdAt and updatedAt fields are both widely used. However, if we decide that we want to specify our own auto-incrementing primary key and remove the createdAt and updatedAt fields, we can define our model using the following code instead:
// Define a "Project" model

var Project = sequelize.define('Project', {
    project_id: {
        type: Sequelize.INTEGER,
        primaryKey: true, // use "project_id" as a primary key
        autoIncrement: true // automatically increment the value
    },
    title: Sequelize.STRING,
    description: Sequelize.TEXT
},{
    createdAt: false, // disable createdAt
    updatedAt: false // disable updatedAt
});
Now that we have defined our Project model (either with or without the “createdAt” and “updatedAt” timestamps) we can look at the rest of the code, ie the sync() operation and creating Project1 - recall:
// synchronize the Database with our models and automatically add the
// table if it does not exist

sequelize.sync().then(function () {

    // create a new "Project" and add it to the database
    Project.create({
        title: 'Project1',
        description: 'First Project'
    }).then(function (project) {
        // you can now access the newly created Project via the variable project
        console.log("success!")
    }).catch(function (error) {
        console.log("something went wrong!");
    });
});
The sequelize.sync() operation needs to be completed before we can do anything else. This ensures that all of our models are represented in the database as tables. If we have defined a model in our code that doesn’t correspond to a table in the database, sequelize.sync() will automatically create it (as we have seen).
Important Note: We do not have to sync() the database before every operation. Only once when the server starts to ensure that the models are correctly represented as tables within the database.
Once our models have been successfully sync()’d with the database, we can start working with the data. You will notice that we use the familiar then() and catch() functions; this is because both sync() and create() return a promise (see “Promises” in the “JavaScript Concept Review” weekly notes) and as we stated above, we must work with the data after the sync() operation has successfully completed.
If sync() resolves successfully, we then wish to create a new record in the “Project” table, so we use Project.create() method and pass it some data (title and description). If the operation completed successfully, we see the message “success!” in the console - otherwise we catch the error and output “something went wrong!”
Defining Models - in detail
One of the most important things we must do when working with Sequelize is to correctly set up all of our models. Once the models are set up successfully, working with the data is simple. Since each model technically corresponds to a table within our database, what we are really doing is defining tables. Each column of a table within our database stores a specific type of data. In our previous example, we define the column title as a STRING and the column description as TEXT within a table called Project. Sequelize provides definitions for a full list of types, and each column is given a type. The following is a list of the most common types:
- Sequelize.STRING - A variable length string. Default length 255
- Sequelize.TEXT - An unlimited length text column.
- Sequelize.INTEGER - A 32 bit integer.
- Sequelize.FLOAT - Floating point number (4-byte precision).
- Sequelize.DOUBLE - Floating point number (8-byte precision)
- Sequelize.DATE - A datetime column
- Sequelize.TIME - A time column
- Sequelize.BOOLEAN - A boolean column
So, if we want to define a model (table) that stores blog entries, we could use the following code:
// Define a "BlogEntry" model

var BlogEntry = sequelize.define('BlogEntry', {
    title: Sequelize.STRING,  // entry title
    author: Sequelize.STRING, // author of the entry
    entry: Sequelize.TEXT, // main text for the entry
    views: Sequelize.INTEGER, // number of views
    postDate: Sequelize.DATE // Date the entry was posted
});
NOTE: It is also possible to introduce data validation when we define our models. For a full list of available rules and how they’re implemented, see: Validators in the official documentation.
Model Relationships / Associations
As we know from our work in earlier semesters, tables (models) can be related using foreign key relationships / associations. For example, say we have a table of Users and a table of Tasks, where each User could have 1 or more Tasks. To enforce this relationship, we would add an additional column on the Tasks table as a foreign-key to the Users table, since 1 or more Tasks could belong to a specific user. For example, “Task 1”, “Task 2” and “Task 3” could all belong to “User 1”, whereas “Task 4” and “Task 5” may belong to “User 2”.
Using Sequelize models, we can easily define this relationship using the hasMany() method on our User model (since “User has many Task(s)”), for example:
// Define our "User" and "Task" models

var User = sequelize.define('User', {
    fullName: Sequelize.STRING, // the user's full name (ie: "Jason Bourne")
    title: Sequelize.STRING // the user's title within the project (ie, developer)
});

var Task = sequelize.define('Task', {
    title: Sequelize.STRING, // title of the task
    description: Sequelize.TEXT // main text for the task
});

// Associate Tasks with user & automatically create a foreign key
// relationship on "Task" via an automatically generated "UserId" field

User.hasMany(Task);
If we wish to create a User and then assign him some tasks, we can “create” the tasks immediately after the user is created, ie:
sequelize.sync().then(function () {

    // Create user "Jason Bourne"
    User.create({
        fullName: "Jason Bourne",
        title: "developer"
    }).then(function (user) {

        console.log("user created");

            // Create "Task 1" for the new user
        Task.create({
            title: "Task 1",
            description: "Task 1 description",
            UserId: user.id // set the correct Userid foreign key
        }).then(function(){ console.log("Task 1 created")});

        // Create "Task 2" for the new user
        Task.create({
            title: "Task 2",
            description: "Task 2 description",
            UserId: user.id // set the correct Userid foreign key
        }).then(function(){ console.log("Task 2 created")});
    });

});
Next, try running this code and take a look at your database in pgAdmin. You should see that two new tables, “Users” and “Tasks” have been created, with “Jason Bourne” inside the “User” table and “Task 1” and “Task 2” inside the “Task” table. The two new tasks will both have a UserId matching “Jason Bourne”’s id! We have achieved the one-to-many relationship between this user and his tasks.
NOTE: other relationships can be defined using the following functions:
- belongsTo()
- hasOne()]
- belongsToMany()
CRUD - Create Read Update Delete
The four major operations that are typically performed on data are Create, Read, Update and Delete (CRUD). Using these four operations, we can effectively work with the data in our database. Assume we have a simple Name model defined:
// Define a "Name" model

var Name = sequelize.define('Name', {
    fName: Sequelize.STRING,  // first Name
    lName: Sequelize.STRING, // Last Name
});
We can use the following code to Create new names, Read a list of names, Update a specific name and lastly Delete a name from the “Name” table in our database
Create
To create new names in our Name table, we can use the following code:
sequelize.sync().then(function () {

    Name.create({
        fName: "Kyler",
        lName: "Odin"
    }).then(function(){ console.log("Kyler Odin created")});

    Name.create({
        fName: "Grier",
        lName: "Garrick"
    }).then(function(){ console.log("Grier Garrick created")});

    Name.create({
        fName: "Kolby",
        lName: "Greyson"
    }).then(function(){ console.log("Kolby Greyson created")});

});
In the above code we create three new objects following the fields defined in our “Name” model. Since our “Name” model is synchronized with the database, this adds three new records - each with their own unique “id” value, as well as “createdAt” and “updatedAt” values for the implicit primary key and timestamp columns. The create function automatically persists the new object to the database and since it also returns a promise, we can execute code after the operation is complete. In this case we simply output the name to the console.
Read
To read entries from our Name table, we can use the following code:
sequelize.sync().then(function () {

    // return all first names only
    Name.findAll({
        attributes: ['fName']
    }).then(function(data){
        console.log("All first names");
        for(var i =0; i < data.length; i++){
            console.log(data[i].fName);
        }
    });

    // return all first names where id == 2
    Name.findAll({
        attributes: ['fName'],
        where: {
            id: 2
        }
    }).then(function(data){
        console.log("All first names where id == 2");
        for(var i =0; i < data.length; i++){
            console.log(data[i].fName);
        }
    });

});
Here, we are once again using a reference to our “Name” model. This time we are using it to fetch data from the “Name” table using the findAll() method. This method takes a number of configuration options in it’s object parameter, such as attributes, which allows you to limit the columns that are returned (in this case we only want ‘fName’) and a where parameter that enables us to specify conditions that the data must meet to be returned. In the above example, id must have a value of 2. See the documentation for advanced queries for more detailed query information.
Lastly, we can also specify an order that the returned data should be in. In the above example, we are not concerned with the order, however in the below “Putting it All Together” example, we wish to order the output by “id” (accomplished by setting the order: parameter to [‘id’])
Update
To update existing names in our Name table, we can use the following code:
sequelize.sync().then(function () {
    // update User 2's last name to "James"
    // NOTE: this also updates the "updatedAt field"
    Name.update({
        lName: "James"
    }, {
        where: { id: 2 } // only update user with id == 2
    }).then(function () { console.log("successfully updated user 2");});

});
In order to “update” a record in the “Name” table, we make use of the update method. This method takes two parameters: an object that contains all of the properties and (updated) values for a record, and a second object that is used to specify options for the update - most importantly, the “where” property. The “where” property contains an object that is used to specify exactly which record should be updated. In this case, it is the row that has an id value of 2.
Delete
To delete existing names in our Name table, we can use the following code:
sequelize.sync().then(function () {

    // remove User 3 from the database
    Name.destroy({
        where: { id: 3 } // only remove user with id == 3
    }).then(function () { console.log("successfully removed user 3");});

});
The delete functionality is actually achieved via a method called destroy. In this case, we invoke the destroy method on the model that contains the record that we wish to remove (ie, “Name”). It takes a single options object as it’s only parameter and like the update function, the most important option is the “where” property. The “where” property contains an object that is used to specify exactly which record should be removed. In this case, it is the row that has an id value of 3.
Putting it All Together
Now that we know to perform each of the CRUD operations when using the Sequelize module, why don’t we see what we can create? This week’s example makes use of many of the modules that were discussed not only today, but in earlier weeks as well (such as express.urlencoded() and express-handlebars) to create a very simple “names registry” application. This web application allows users to manipulate a persistent list of full names (first name & last name) by Creating new names to add to the list, Reading the full list of names, Updating existing names and finally, Deleting names from our back-end Postgres database.
To run this example locally, you will have to update your dependencies (see package.json) via npm in the integrated terminal as well as the connection to your Postgres database in the server.js file, under the comment “// define the connection to our Postgres instance”.
Once the application is running, you will be able to see all of the changes reflected in your Postgres database via pgAdmin (don’t forget to refresh your data) and every time you run the server and test the application in a browser, you will see the same, updated list of names!