![]()
WEB700
Web Programming Foundations
Schedule Notes Resources Graded Work MyApps Instructions Vercel Guide Code examplesGetting Started with Vercel
![]()
The main server environment that we will be using in this course is Vercel
“Vercel is a platform for developers that provides the tools, workflows, and infrastructure you need to build and deploy your web apps faster, without the need for additional configuration.
Vercel supports popular frontend frameworks out-of-the-box, and its scalable, secure infrastructure is globally distributed to serve content from data centers near your users for optimal speeds.”
Essentially, Vercel manages the hardware infrastructure and deployment tasks for our node.js applications in a remote environment. Apps deployed using Vercel are hosted on Vercel’s infrastructure, which utilizes AWS services such as AWS Lambda, S3, CloudFront, and DynamoDB, among others
To get started, developers push their code to GitHub and Vercel does the rest. Additionally, Vercel provides a range of projects as “templates”. These can be used to get started quickly or can be used as reference implementations to see how a particular framework can be deployed effectively.
The best thing - getting started is free! - This is where we come in:
Required Software
-
By now, you should have Node.js (available here) and Visual Studio Code (available here). However we will also need git
-
To download git, proceed to this download page and download git for your operating system.
-
Proceed to install git with the default settings. Once this is complete, you can verify that it is installed correctly by opening a command prompt / terminal and issuing the command git --version. This should output something like: git version 2.37.2 ( … ). If it does not output the installed version of git, then something is wrong and it is not installed correctly.
-
Lastly, for Vercel to gain access to our code, we must eventually place it on GitHub. Therefore, you must also have account on GitHub before proceeding.
Configuring your App for Vercel
Before we can start working with Vercel, we must make a few key changes to our code to ensure that it can be successfully deployed on Vercel. These include:
Adding a “vercel.json” file.
For our applications (defined in a “server.js” file), we must add the following “vercel.json” file to the root of our project:
{
  "version": 2,
  "builds": [
    {
      "src": "server.js",
      "use": "@vercel/node",
      "config": { "includeFiles": ["dist/**"] }
    }
  ],
  "routes": [
    {
      "src": "/(.*)",
      "dest": "server.js"
    }
  ]
}
Setting the “views” Application Setting
If you are using a template engine in your application (ie: Express Handlebars), then you will need to add the line:
app.set('views', __dirname + '/views');
before your route definitions.
Updating your “express.static()” Middleware
Similarly, if you are using the “express.static()” middleware to define a “public” folder, you must also include the “__dirname” in your path, ie:
app.use(express.static(__dirname + '/public'));
Explicitly Requiring the “pg” Module
If you are using Sequelize with the “pg” / “pg-hstore” modules, Vercel will give you an error if you do not explicitly require the “pg” module, ie:
require('pg'); // explicitly require the "pg" module
const Sequelize = require('sequelize');
Committing Your Code
Once you have configured your code for Vercel and you are ready to publish it, the next steps are to initialize a Git repository at the root of your project folder and push your code to GitHub:
-
First, issue the following command from the integrated terminal at the “root” folder of your project: git init - this will initialize a local git repository in your helloworld folder.
-
Next, create a file called .gitignore containing the text:
node_modulesThis will ensure that the node_modules folder does not get included in your local git repository
-
Finally, click the “Source Control” icon in the left bar (it should have a blue dot next to it) and type “initial commit” for the message in the “Message” box. Once this is done, click the checkmark above the message box to commit your changes.
NOTE: If, at this point, you receive the error: “Git: Failed to execute git”, try executing the following commands in the integrated terminal:
git config --global user.email "you@example.com"
git config --global user.name "Your Name"
Once this is complete, attempt to click the checkmark again to commit your changes.
Create a GitHub Repository
For Vercel to gain access to our code, we must place it on GitHub. Therefore, the next step in this process is creating a GitHub repository for your code:
-
Sign in to your GitHub account.
-
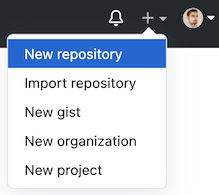
Find and click a “+” button on the Navigation Bar. Then, choose “New Repository” from the dropdown menu.
-
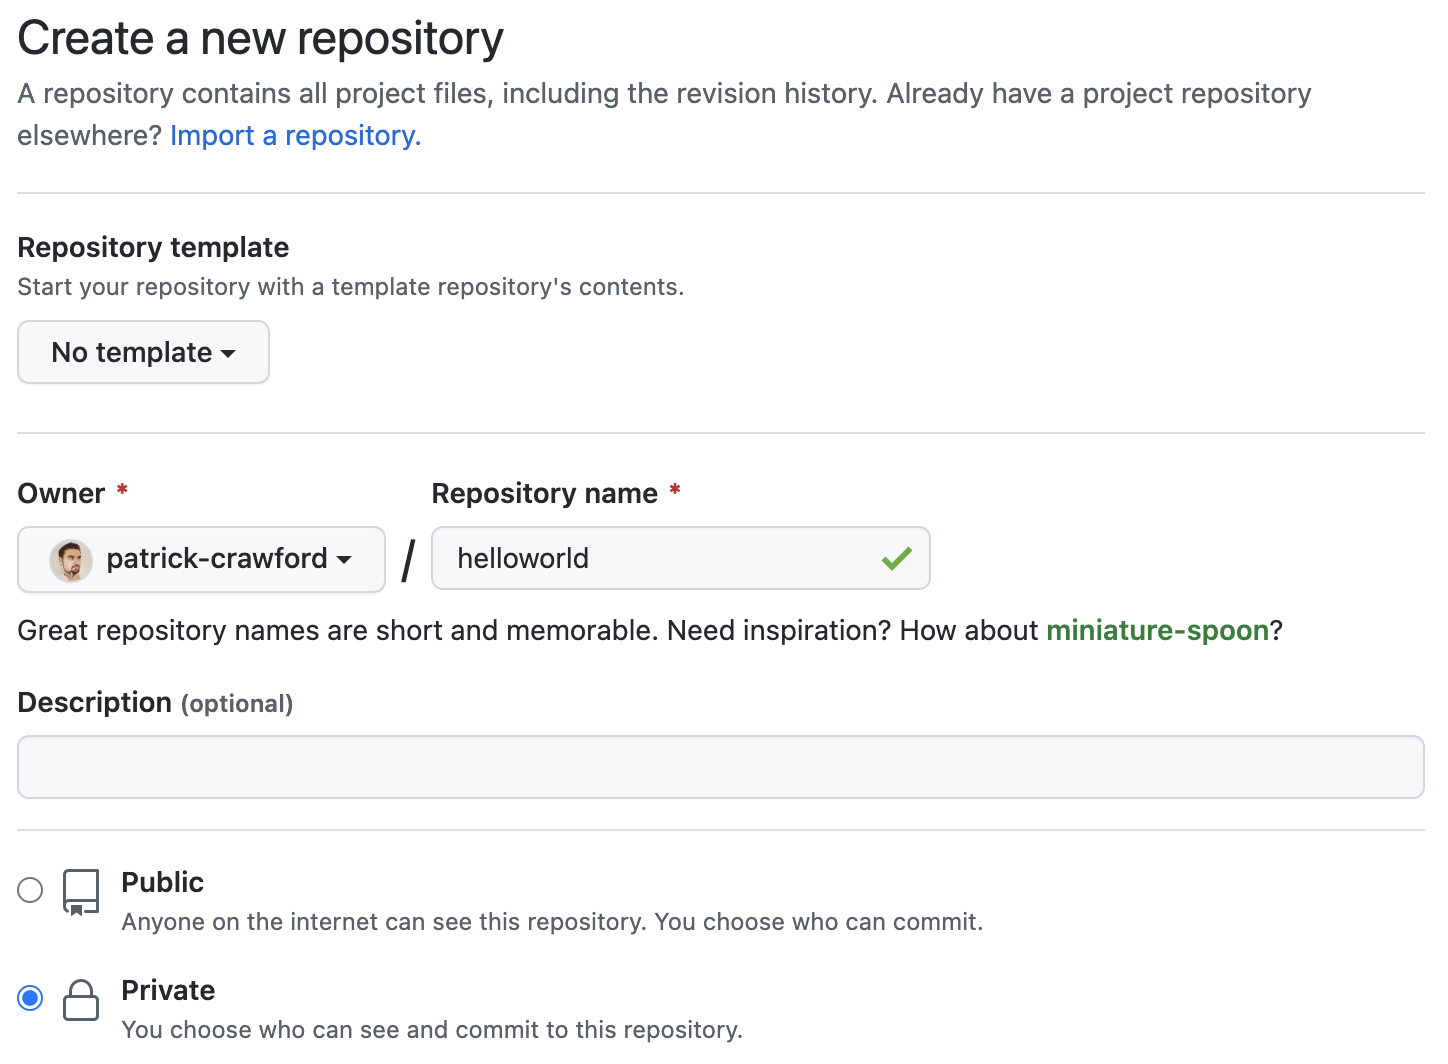
Fill in the repository name text field with the name of your project. Also, please make sure that the “Private” option is selected:
-
Once you’re happy with the settings, hit the “Create repository” button.
Connect the Local Git Repository to GitHub
Now that our GitHub repository is created, we can proceed to update it with our local copy:
-
First, go to your newly-created GitHub repository and click the “copy” button in the “Quick Setup” block:
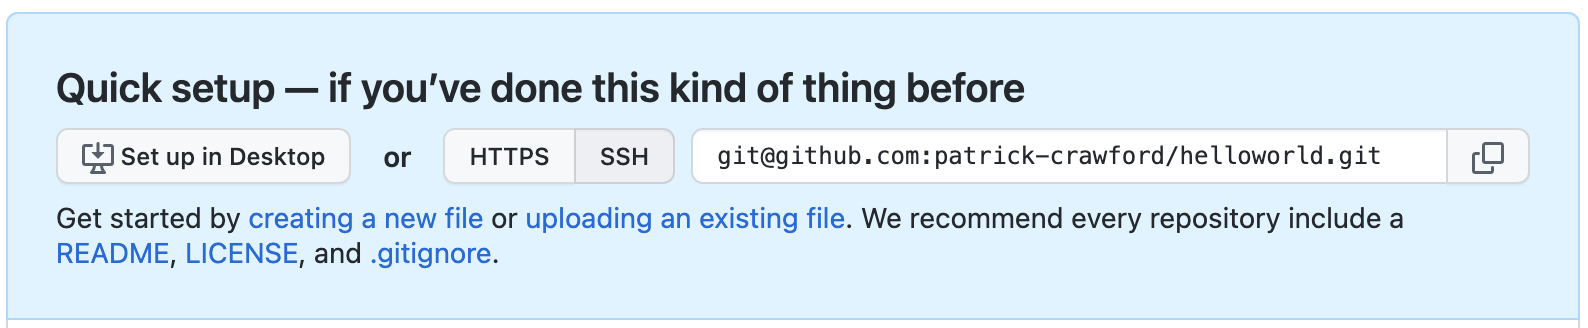
This will copy the URL of your remote GitHub repository.
-
Next, go back to your Terminal again and add this remote URL by running the following command:
git remote add origin URL
where URL is the remote repository URL that you have copied in the previous step.
-
To confirm that “origin” was added correctly, run the command:
git remote -v. You should see something like this:origin git@github.com:patrick-crawford/helloworld.git (fetch) origin git@github.com:patrick-crawford/helloworld.git (push) -
Finally, you can push the code from your local repository to the remote one using the command:
git push origin masterImportant Note: If at this point, you see the error: “src refspec master does not match any” then “master” is not set as your default branch. Execute the command
git statusto determine which branch you’re on (it may be “main”) and push that instead, ie:git push origin main, for example
You can verify that the code was pushed by going back to your Browser and opening your GitHub repository.
Connect the GitHub Repository to Vercel
You should now be ready to push your code to Vercel. First, browse to https://vercel.com and hit the “Start Deploying” button.
-
Next, press the “Continue with GitHub” button, since our code is located on GitHub.
-
If you are not currently logged in to GitHub, you will need to provide your credentials in a pop-up window before continuing.
-
Once you have logged in to GitHub, you will be taken to the Let’s build something new. screen in Vercel, which prompts you to “Import Git Repository”. From here, you will need to click “+ Add GitHub Account”
-
This will prompt you to “Install Vercel”. Feel free to install it for “All repositories”
-
You should now see your repository available for import. To proceed, click Import
-
At the next page, you are not required to make any changes, as Vercel should detect that we are using Node.js. If you had any environment variables, you could set them here as well. Once you are done, click Deploy.
-
Once the deploy step has completed, you should be taken to a “Congratulations!” page with a black button labeled Go To Dashboard. Click this to see the information about your deployment.
Make Changes and Push to GitHub
Finally, our code is linked to Vercel via. GitHub!
You should now be able to make any changes you wish and trigger a redeploy of your server on Vercel by simply making changes locally, checking in your code using git and “pushing” it to GitHub, using the above instructions.
Good luck and Happy Coding!
Alternative (Render)
Render, like Vercel, also has a free tier that is available without a credit card or separate account (you can use GitHub to sign in):
“It’s easy to deploy a Web Service on Render. Link your GitHub or GitLab repository and click Create Web Service. Render automatically builds and deploys your service every time you push to your repository. Our platform has native support for Node.js, Python, Ruby, Elixir, Go, and Rust. If these don’t work for you, we can also build and deploy anything with a Dockerfile.”
Unfortunately, the main drawback of using the free services of Render is that our deployments (web services) are spun down after 15 minutes of inactivity. This will cause a significant delay in the response of the first request after a period of inactivity while the instance spins up.
For more information see the official documentation on “Free Web Services”.
To get started using Render, click the “GET STARTED FOR FREE” button on their main site. This will take you to a login page where you can use your GitHub account for authentication.
Once logged in, click the blue “New +” button in the top menu bar and choose “Web Service”. This will take you to a page where you can choose your GitHub repository for deployment. If you do not see your repository in the “Connect a repository” section, Click “Configure account” under the “GitHub” heading in the right sidebar. This will allow us to grant “Render” permission to all of our repositories (essentially performing the same task that was necessary for Vercel to access our repositories ).
Once this is complete and you can see your repository in the list, click the corresponding “Connect” button. You will then be taken to a screen where you must provide:
- A unique name for your web service
- A “start” command (this will typically be “node server.js”, ie: the same “start” command that you will find in your package.json file)
Finally, ensure that the “Free” instance type is checked and click “Create Web Service” and wait for your code to build and deploy.