![]()
WEB700
Web Programming Foundations
Schedule Notes Resources Graded Work MyApps Instructions Vercel Guide Code examplesWEB700 Week 10 Notes
AJAX Introduction / Practical AJAX Programming
Up until this point, everything in this course has involved logic that exists primarily on the server (server-side). However, there is one piece of technology that plays a vital role on the client side that needs to be discussed as well. This is AJAX (Asynchronous JavaScript and XML) - a collection of technologies used together to create a richer user experience by enabling data to be transferred between a web client (browser) and web server without the need to refresh the page.
AJAX Introduction: The Fetch API
In modern browsers, we can use the “Fetch API” to make AJAX requests. Essentially, we can configure a new Request by providing two parameters:
- The location of the resource
- A set of “options”, (defined as a simple Object)
The Location parameter is simply the URI of the resource, ie: “https://reqres.in/api/users/”, while the “Options” parameter could contain any number of options, including:
- The http method, ie: ‘POST’
- The ‘body’ of the request, ie: ‘JSON.stringify({user:”John Doe”, job:”unknown”})’
- An object consisting of a number of headers, ie: ‘{“Content-Type”: “application/json”}’
- And Many Others
In practice, this would look something like this:
var myRequest = new Request('https://reqres.in/api/users/', {
                    method: 'POST',
                    body: JSON.stringify({user:"John Doe", job:"unknown"}),
                    headers: {
                        'Content-Type': 'application/json'
                    }
                });
Once the request is configured, we can “Fetch” the data using “fetch” and providing our request. This “fetch” method will return a promise that resolves with a “response” object that has a number of methods, including:
- response.text() - which we can use to read the ‘response’ stream. This method returns a promise that will resolve into text.
- response.json() - which we can use to read the ‘response’ stream. This method returns a promise that will resolve into an object.
To execute the request defined above (ie: myRequest), we can wire up the “fetch” using the following code (assuming that our resource is returning JSON-formatted data).
fetch(myRequest).then(function(response) {
    return response.json();
}).then(function(json){
    console.log(json); // here is the parsed JSON response
});
AJAX: The Fetch API (Compressed)
To save lines and make your code more readable and concise, the above two pieces of code can be combined, ie:
fetch('https://reqres.in/api/users/', {
    method: 'POST',
    body: JSON.stringify({user:"John Doe", job:"unknown"}),
    headers: { 'Content-Type': 'application/json'}
})
.then(response => response.json())
.then(json => {
    console.log(json);
});
NOTE: Our code is even shorter if we’re simply doing a “GET” request, ie:
fetch('https://reqres.in/api/users/')
.then(response => response.json())
.then(json => {
    console.log(json);
});
JSON Introduction
As we have seen from above, the format of choice when sending data to/from a webserver using AJAX is JSON (JavaScript Object Notation). This is a plain-text format that easily converts to a JavaScript object in memory. Essentially, JSON is a way to define an object using “Object Literal” notation, outside your application. Using the native JavaScript built-in JSON Object, we can preform the conversion from plain-text (JSON) to JavaScript Object (and vice-versa) easily. For example:
Converting JSON to an Object
let myJSONStr = '{"users":[{"userId":1,"fName":"Joe","lName":"Smith"},{"userId":2,"fName":"Jeffrey","lName":"Sherman"},{"userId":3,"fName":"Shantell","lName":"McLeod"}]}';

// Convert to An Object:
let myObj = JSON.parse(myJSONStr);

// Access the 3rd user (Shantell McLeod)
console.log(myObj.users[2].fName); // Shantell
Converting an Object to JSON
let myObj = {users: [{userId:1,fName:"Joe",lName:"Smith"},
                        {userId:2,fName:"Jeffrey",lName:"Sherman"},
                        {userId:3,fName:"Shantell",lName:"McLeod"}]};

let myJSON = JSON.stringify(myObj);

console.log(myJSON); // Outputs: '{"users":[{"userId":1,"fName":"Joe","lName":"Smith"},{"userId":2,"fName":"Jeffrey","lName":"Sherman"},{"userId":3,"fName":"Shantell","lName":"McLeod"}]}'
Responding with JSON
Now that we’re refreshed with the concept of actually making an AJAX request from the client side, why don’t we set up a new web server to respond to the request with some JSON? Fortunately, the Express.js framework makes this fairly simple with it’s res.json method. In this case, we can pass the function a JavaScript Object and the method will automatically “stringify” it and send the converted JSON as the response. It will even include the correct Content-Type header value (ie: “application/json”). For example:
const express = require("express");
const app = express();

const HTTP_PORT = process.env.PORT || 8080;

// setup a 'route' to listen on the default url path (http://localhost)
app.get("/", (req, res) => {

    let message = { msg: "Welcome!"};

    // send the message as JSON
    res.json(message);
});

// setup http server to listen on HTTP_PORT
app.listen(HTTP_PORT, () => {
    console.log("Express http server listening on: " + HTTP_PORT);
});
Creating a REST API (Introduction)
You may have heard of the term REST or RESTful API when reading about Web Programming. In fact, we have made use of a real REST API (see the publicly available: https://reqres.in) to practice our AJAX skills by making requests for data. At it’s most basic level, you can essentially think of a REST (“Representational State Transfer”) API as a way to use the HTTP protocol (ie, “GET”, “POST”, “PUT”, “DELETE”, etc…) with a standard message format (ie, JSON or XML) to preform CRUD operations on a data source.
What makes this so valuable is that by creating a RESTful API, we remove any assumptions about how a client will access the data. We could make HTTP requests to the API from a website, mobile app, etc. and it would be the website or app’s job to correctly render the data once it’s received. This simplifies development of front-end applications that use the data and even removes any specific programming language requirements for the client! If it can handle HTTP requests / responses and JSON, it can use our data!
Before we think about getting any kind of persistent storage involved however, why don’t we first see how we can configure all of our routes in our server to allow for CRUD operations on a simple collection of users in the format
{userId: number, fName: string, lName: string}
| Route | HTTP Method | Description |
|---|---|---|
| /api/users | GET | Get all the users |
| /api/users | POST | Create a user |
| /api/users/:userId | GET | Get a single user |
| /api/users/:userId | PUT | Update a user with new information |
| /api/users/:userId | DELETE | Delete a user |
When these routes are applied to our Express server code, we get something that looks like this:
const express = require("express");
const app = express();

const HTTP_PORT = process.env.PORT || 8080;

app.get("/api/users", (req, res) => {
    res.json({message: "fetch all users"});
});

app.post("/api/users", (req, res) => {
    res.json({message: "add a user"});
});

app.get("/api/users/:userId", (req, res) => {
    res.json({message: "get user with Id: " + req.params.userId});
});

app.put("/api/users/:userId", (req, res) => {
    res.json({message: "update User with Id: " + req.params.userId});
});

app.delete("/api/users/:userId", (req, res) => {
        res.json({message: "delete User with Id: " + req.params.userId});
});

// setup http server to listen on HTTP_PORT
app.listen(HTTP_PORT, () => {
    console.log("Express http server listening on: " + HTTP_PORT);
});
Here, we have made use of the request object’s params method to identify the specific user that needs to be fetched, updated or deleted based on the URL alone. In a sense, what we’re allowing here is for the URL + HTTP Method to act as a way of querying the data source, as /api/users/3, /api/users/4923 or even /api/users/twelve will all be accepted. They may not necessarily return valid data, but the routes will be found by our server and we can attempt to preform the requested operation.
Now that we have all of the routes for our API in place, why don’t we create a “view” that will make AJAX requests to test our API functionality? To begin, create a views folder and add the file index.html. This will be a simple HTML page consisting of 5 buttons (each corresponding to a piece of functionality in our API) and some simple JavaScript to make an AJAX request.
However, since we are serving this file from the same server that our API is on, we will need to add some additional code to our server file; specifically:
const path = require("path");
and
app.get("/", (req,res) => {
    res.sendFile(path.join(__dirname, "/views/index.html"));
});
Finally - our server is setup and ready to serve the index.html file at our main route (“/”). Our next step is to add our client-side logic / JS to the index.html file. Here, we hard-code some requests to the API and output their results to the web console to make sure they function correctly:
<!doctype html>
<html>
    <head>
        <title>API Test</title>
        <script>
            function makeAJAXRequest(method, url, data){
                if(data){ // Make an AJAX call using the provided data & method
                    fetch(url, {
                        method: method,
                        body: JSON.stringify(data),
                        headers: { 'Content-Type': 'application/json'}
                    })
                    .then(response => response.json())
                    .then(json => {
                        console.log(json);
                    });

                }else{  // Make an AJAX call without providing data using the method
                    fetch(url, { method: method })
                    .then(response => response.json())
                    .then(json => {
                        console.log(json);
                    });
                }
            }
            function getAllUsers(){
                 makeAJAXRequest("GET", "/api/users");
            }

            function addNewUser(){
                 makeAJAXRequest("POST", "/api/users", {fName: "Bob", lName: "Jones"});
            }

            function getUserById(){
                makeAJAXRequest("GET", "/api/users/2");
            }

            function updateUserById(){
                makeAJAXRequest("PUT", "/api/users/2", {fName: "Wanda", lName: "Smith"});
            }

            function deleteUserById(){
                makeAJAXRequest("DELETE", "/api/users/2");
            }

        </script>
    </head>
    <body>
        <p>Test the API by outputting to the browser console:</p>
        <!-- Get All Users -->
        <button type="button" onclick="getAllUsers()">Get All Users</button><br /><br />
        <!-- Add New User -->
        <button type="button" onclick="addNewUser()">Add New User</button><br /><br />
        <!-- Get User By Id -->
        <button type="button" onclick="getUserById()">Get User</button><br /><br />
        <!-- Update User By Id -->
        <button type="button" onclick="updateUserById()">Update User</button><br /><br />
        <!-- Delete User By Id -->
        <button type="button" onclick="deleteUserById()">Delete User</button>
    </body>
</html>
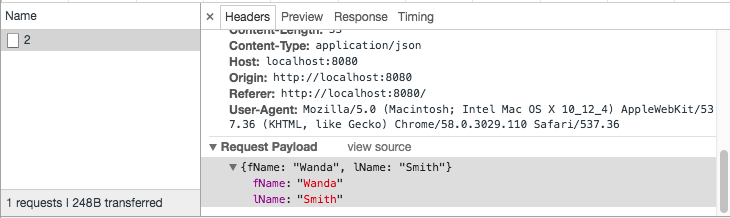
Once you have entered the above code, save the changes and try running your server locally to see what happens. You will see that All of the routes tested return a JSON formatted message! Now we know that our REST API will correctly respond to AJAX requests made by the client. Additionally, If you open the Network tab (Google Chrome) before initiating one of the calls to Update or Add a New User, you will see that our request is also carrying a payload of information, ie:
If we wish to capture this information in our routes (so that we can make the appropriate updates to our data source), we must make some small modifications to our server.js file and individual routes (ie: POST to “/api/users” & PUT to “/api/users/:userId”). The first thing that we must do is incorporate middleware to parse the incoming data. Recall from week 8 - we used “express.urlencoded()” access the “body” component of the request. However, since we will be parsing JSON data, we must instead use “express.json()”, ie:
app.use(express.json());
Now that this change has been made, we can access data passed to our API using the req.body property. More specifically, we can update our POST & PUT routes to use req.body to fetch the new / updated fName and lName properties:
app.post("/api/users", (req, res) => {
    res.json({message: "add the user: " + req.body.fName + " " + req.body.lName});
});
and
app.put("/api/users/:userId", (req, res) => {
    res.json({message: "update User with Id: " + req.params.userId + " to " + req.body.fName + " " + req.body.lName});
});
If you have followed the instructions above correctly, your server.js file should look like this:
const express = require("express");
const path = require("path");
const app = express();

const HTTP_PORT = process.env.PORT || 8080;

app.use(express.json());

app.get("/", (req,res) => {
    res.sendFile(path.join(__dirname, "/views/index.html"));
});

app.get("/api/users", (req, res) => {
    res.json({message: "fetch all users"});
});

app.post("/api/users", (req, res) => {
        res.json({message: "add the user: " + req.body.fName + " " + req.body.lName});
});

app.get("/api/users/:userId", (req, res) => {
    res.json({message: "get user with Id: " + req.params.userId});
});

app.put("/api/users/:userId", (req, res) => {
    res.json({message: "update User with Id: " + req.params.userId + " to " + req.body.fName + " " + req.body.lName});
});

app.delete("/api/users/:userId", (req, res) => {
        res.json({message: "delete User with Id: " + req.params.userId});
});

// setup http server to listen on HTTP_PORT
app.listen(HTTP_PORT, () => {
    console.log("Express http server listening on: " + HTTP_PORT);
});
If we try running our server and test our API again, you will see that the messages returned back from the server correctly echo the data sent to the API! We now have everything that we need to preform simple CRUD operations via AJAX on a data source using a RESTful service. The only thing missing is the data store itself.
NOTE: If we want to allow our API to respond to requests from outside the domain (this is what https://reqres.in does), we will have to enable Cross-Origin Resource Sharing (CORS) - see the 3rd party CORS middleware