![]()
WEB700
Web Programming Foundations
Schedule Notes Resources Graded Work MyApps Instructions Vercel Guide Code examplesWEB700 Week 5 Notes
Introduction to Express.js
What is express.js?
Taken directly from the express.js website:
Express is a minimal and flexible Node.js web application framework that provides a robust set of features for web and mobile applications.
What does that mean exactly?
Express is a node module that takes a lot of the leg work out of creating a framework to build a website. It is extremely popular in the node.js community with tens of thousands of developers using it to build websites. It is a proven way to build flexible web applications quickly and easily.
The express website has very good documentation and we will refer to it frequently in this week’s notes for examples and documentation.
API docs and code examples
The current major version of Express is 4.x. The documentation is available here - they do a great job keeping it up to date and provide excellent code examples to explain the concepts.
In the lecture for this week we will go over most of the main features of express in the API, which will enable you to setup a basic web server with node and express that can accept requests and send responses from a client for various url ‘routes’. A url route is a piece of the url that comes after the host. For example, in the url http://www.seneca.ca/courses/ the host is www.seneca.ca, the route (in Express terms) is /courses.
The Application object
Taken directly from the Express API documentation ( updated to use ES6 style syntax) - here is a very simple example on how to start a web server on localhost, listening on port 8080 on the main ‘root’ route.
const express = require("express");
const app = express();

app.get("/", (req, res) => {
  res.send("hello world");
});

app.listen(8080);
The app variable in the example above represents the express main application object. It contains several methods for routing requests, setting up middleware, and managing html views or view engines.
In the above example we setup a route on the index of the host to handle GET requests to “/”. This means any requests to localhost:8080/ will be sent to this function. The standard form of a route handler in express is to call the verb method that matches the type of request on the app object and pass it 2 parameters: a string representing the route you want this route to match against, and a callback function to invoke when the route is matched. In the above example we want to handle GET requests (typically requests from the browser to load the page initially). In other words ‘get’ the data for this route and call the provided function when that route is hit with a GET request.
All the other common HTTP verbs are supported as well. POST, PUT, DELETE, etc. You can also use app.all() to cover all HTTP verbs with one function.
Here are some of the commonly used application properties and methods you will typically make use of.
- This property allows you to attach local variables to the application, which persist throughout the life of the app. You can access local variables in templates rendered within the application (discussed in week 9 - “Template Engines – Handlebars.js”).
- This method will catch all HTTP requests for all verbs. IE: GET, PUT, POST, DELETE, etc. for a matching path.
- Routes a HTTP DELETE request for a matching path to a callback function specified.
- The engine method is used to map a specific view extension to a template engine. For example if you want to map all html view templates to a specific engine you would register it here.
- Routes a HTTP GET request for a matching path to a callback function specified.
- The function is typically called once to setup a port and optionally a host to listen on for requests. This is the core method on the express application that helps setup a https server and allows it to listen on a specified port. HTTP default port is 80, HTTPS default port is 443.
- Routes a HTTP POST request for a matching path to a callback function specified.
- Routes a HTTP PUT request for a matching path to a callback function specified.
- The use method is used to add middleware to your application. Middleware consists of functions (typically placed before the routing methods) that automatically execute either when a specified path is matched or globally before every request. This is very useful when you want to do something with every request like add properties to the request object or check if a user is logged in.
The Request object
The req object represents the object that contains all the information and metadata for a request to the server. When you see examples of the request object in use it will always typically be referred to as ‘req’ (short for request object).
There are several ways to send data from the client to the server. Four of the more common ways are: send a POST request with data in the body of the request, send data in cookies, send the data in the url, or send the data in the query string.
Here is a table of the common properties and methods used on the request object (req).
- The req.body property contains the data submitted from a request. It requires that you use a body parsing middleware first which will attach the parameters to req.body. If you post data in your request then this is how you access that data. See the example in the docs on how it’s used.
- The second way of sending data is through a cookie. If you are using a cookie and you use cookie parsing middleware, then the cookie data will be available on the req.cookie object.
- The third way of sending data is in the url. For example, if you want to have a url in the pattern /user/:name where the :name is dynamic; ie: for ‘Bob’ it’s /user/bob and for ‘Mary’ it’s /user/mary. You can have one route which can accept an infinite number of requests with different user names and dynamically handle / access each differing username through req.params (ie: request.params.user).
- The fourth way of sending data from the client to the server is in the query string. If you send data for a user using a url like /user?user=bob then you can access that username with req.query.user. ‘query’ will be an object with key value pairs matching the key value pairs sent in the query string of the request.
- req.get() is useful for checking what the values are of any of the headers sent with the request. If you need to check the ‘content-type’ for example or the ‘referer’ or ‘user-agent’ headers.
The Response object
The response object represents the object that contains all the information and metadata for a response from the server. When you see examples of the response object in use it will always typically be referred to as ‘res’ (short for response object). The data you send back from the server can one of several different formats -the most common are HTML, JSON, CSS, JS and plain files (.pdf, .txt, etc).
Here is a table of the common properties and methods used on the response object (res).
- This allows you to set a cookie on the response with a name = value key pair. You can set the value of the name to a string or an object in JSON notation and it will be attached to the response header of the response.
- This allows you to send a file back as a response. The user’s browser will display a download prompt and the response will set the Content-Type and Content-Disposition headers for you. Use this to send files back to a user.
- Use this if you want to end a response immediately and send nothing back. You can also chain .end() off of .status to send a status code and end the response, ie: res.status(400).end();
- You can use res.get() to lookup any header that is outgoing on the response. This can be useful to check if certain headers are set to certain values and respond accordingly.
- You can use res.json() to send back a JSON object with key value pairs of data. The values can be any valid JSON type, even Arrays and other objects. This method also automatically “stringifies” a JavaScript object, so no conversion is needed before an object is provided. Additionally, The json() method will automatically set the correct Content-Type header.
- Use this to perform a redirect to another page on your site, go back to the previous page, or redirect to another domain all together.
- This is the bread and butter response method to send back a response to the client. You can send a String, an object, an Array, or even a Buffer object back to the client. The send() method will automatically set the Content-Type header for you based on the type of data sent.
You can use this to send back a specific status code and appropriate response to go with it. status() is chainable before a send() so you can do operations such as: res.status(404).send(“Page Not Found”); to send a 404 response code for a resource that is not found or invalid.
Routing, static files
Now that we’ve gone over the three core objects related to express let’s show some examples of them in use by writing a few functions and building out a basic web server with a few routes and some statically served files.
Routing is one of the core features of express. A detailed guide can be found here in the Express documentation. It is the component that handles setting up routes on your server that can be accessed by the client. A ‘route’, as mentioned before, is a path on your site that can have requests sent to it, and respond from it. Each route gets registered with express ‘routers’ and has callback functions that get called when a request to that route is made.
Requests to routes can also be processed by multiple route definitions if your application requires it. More on that in the middleware section below.
For now let’s create a simple web server with express that can handle requests to “/”, “/headers”, and anything else will be considered a 404 or page not found.
const express = require("express");
const app = express();
const HTTP_PORT = process.env.PORT || 8080;
// call this function after the http server starts listening for requests
function onHttpStart() {
console.log("Express http server listening on: " + HTTP_PORT);
}
// setup a route on the 'root' of the url
// IE: http://localhost:8080/
app.get("/", (req, res) => {
res.send("<h1>Welcome to my simple website</h1><p>Be sure to visit the <a href='/headers'>headers page</a> to see what headers were sent from your browser to the server!</p>");
});
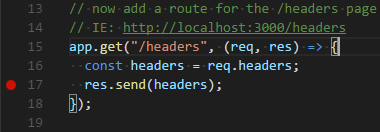
// now add a route for the /headers page
// IE: http://localhost:8080/headers
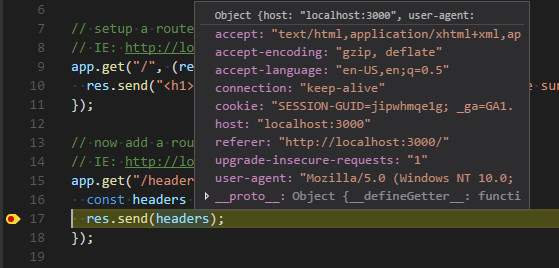
app.get("/headers", (req, res) => {
const headers = req.headers;
res.send(headers);
});
// This use() will not allow requests to go beyond it
// so we place it at the end of the file, after the other routes.
// This function will catch all other requests that don't match
// any other route handlers declared before it.
// This means we can use it as a sort of 'catch all' when no route match is found.
// We use this function to handle 404 requests to pages that are not found.
app.use((req, res) => {
res.status(404).send("Page Not Found");
});
// listen on port 8080. The default port for http is 80, https is 443. We use 8080 here
// because sometimes port 80 is in use by other applications on the machine
app.listen(HTTP_PORT, onHttpStart);
Try out this code in a new node application and run it from the command line. You will need to have express installed using ‘npm install express’ since we have not created a package.json file for this application.
Now try visiting http://localhost:8080 in your browser to view your website. Click on the headers link and you should see a json object that represents the headers object on the request. Have a look at the key ‘user-agent’ and it’s value. Try opening http://localhost:8080/headers in another browser and see how it differs.
Try visiting a route that is not the home route “/” or “/headers”. You should see the 404 Page Not Found message to indicate this route is not valid for this website.
Now that we have covered handling basic routes for a page and how to accept get requests that can respond with data; the next question is: “how do we respond to requests for things like images, or css files?” (NOTE: CSS will be discussed in greater detail in week 7)
Serving static files
Static file serving refers to responding back to a client for a request to a static resource. A static resource is a resource (file) that is not going to change and is required as part of the content for the site. Perfect examples are images and css files that need to be requested from the site and loaded on the page. We can’t make a route to handle loading each image for the website -that would be tedious and impossible to maintain. Instead, it would be better to just specify a folder that contains all those static resources and allow express to handle sending those files back to the client when they are requested.
Check out the guide on Serving static files in Express on their website for the full information. We will do a simple example below to add an image to the home page and serve it statically from express
// setup the static folder that static resources can load from
// like images, css files, etc.
app.use(express.static("static"));
Add this code to the previous example just before the first app.get route handler. The “static” string refers to the name of the directory, relative to where the server is running from, that contains the static content. The “static” string does not become part of the URL in this example, it is just specifying to express where to server static resources from.
Now we can put images or css files in the /static folder, and link to them from our website. In week 9 we will cover templating and this will come in handy when we start working with html templates.
Try adding an image to the static folder, and including it in an <img> element for the main route response.
Middleware
Middleware in Express refers to functions that can execute in the ‘middle’ of a request/response cycle typically before a matching route function is executed.
Taken directly from the Express documentation:
Middleware functions are functions that have access to the request object (req), the response object (res), and the next() function in the application’s request-response cycle. The next() function is a function in the Express router which, when invoked, executes the middleware succeeding the current middleware.
There are 5 types of middleware:
- Application level middleware is bound to your entire application and can run when every request comes in or only when it matches a specified route. Examples in the documentation.
- Router level middleware works the same way as application middleware but is attached to a separate router instance which means it can be applied only to a subset of all the routes in your application that are under that router.
- Error handling middleware is defined with 4 parameters in the callback function. (err, req, res, next) is the signature. You must specify all 4 parameters so that express can differentiate it from a regular middleware function in which case next would be undefined. Error handling middleware gets called when a regular middleware function calls next(err) instead of next(). Passing next an error object will invoke the error handlers instead of the next route handlers.
-
In the latest version of Express, there are three built-in middleware functions (the latter two, available only in Express 4.16.0 and above):
- express.static - Mentioned in the “serving static files” section
- express.json - Used to parse incoming requests with JSON payloads.
- express.urlencoded - Used to parse incoming requests with URL-encoded payloads (typically form POST submissions)
- With express 4.x, previously included middleware that did common things like handle cookies or handle file uploads, have been moved to third party middleware packages. This way you can add them as you need them and reduce bloat in your system. If you’re never going to handle file uploads, why have middleware loaded? A great list of some of the most popular third party middleware is available here.
Error Handling
Error handling in Express is typically done through middleware. As mentioned above, when you write a middleware function with 4 parameters, it will be interpreted by express as an error handler function. You can write multiple error handlers for handling different states of errors and use them in the same way you use middleware. By calling next(), it will invoke the next error handler in the chain and by sending a response it will terminate the chain. The error handling page on Express’s website has great examples. A common errorHandling procedure would be to log the error in the server console or database, return a 500 status code to the client, and send them to a 500 page or something else appropriate for your app.
function handleClientError(err, req, res, next) {
  // log the error to the DB with a utility method to log errors
  logError(err);

  // if the request was an xhr request respond with a 500 status and JSON message
  // otherwise respond with a string message
  if (req.xhr) {
    res.status(500).send({ message: 'There was an error processing your request' })
  } else {
    res.status(500).send('Something went wrong processing your request')
  }
}
Debugging in Visual Studio Code
Visual Studio Code has great debugging support for the node.js/express ecosystem. Before we start debugging however, we need to place “breakpoints” within our code where we would like the execution to halt, so that we can inspect the values of variables and step through the code line-by-line.
To place a breakpoint, click just to the left of a line number in a file and a red circle will appear indicating the code execution will stop at this line when the debugger is running.
Next, you will notice that there is a tab on the left side of VS Code.

Click this after you have placed your breakpoints within your code to open the “debugger” panel.
From here, click on the first option “Run and Debug” - this will open a menu prompting you to “Select Environment”. Since we’re using Node.js, choose the “Node.js” option. You will see that the “Debug Console” has opened up, showing that our server is indeed running.
You can now open your browser and access your web app as usual. However, this time whenever a breakpoint is encountered, the server will halt, allowing you to inspect your code:
When you are finished inspecting, you can press play to continue with execution to the next breakpoint, or stop the program with the stop button on the debugger control bar.

Note: If if the “Debug Console” tab is still active in the “integrated terminal” after you are finished debugging, simply click on the “Terminal” tab to return to the terminal.
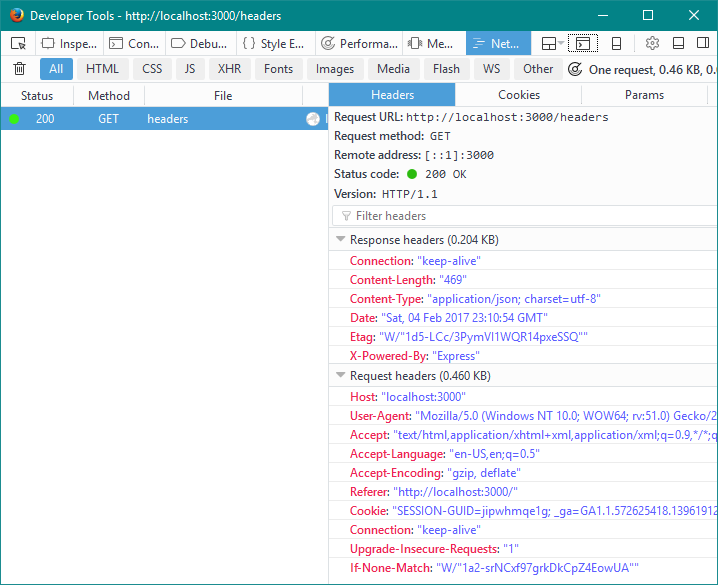
The browser network tab
Chrome, Firefox, and IE all include developer tool and each of those tools has a network tab. The network tab of the dev tools allows you to see all requests going out from the browser to another server and the responses you get back from them.
In Firefox, you can inspect the headers from the headers tab:
And the response from the server in the response tab. The Google Chrome network tools are slightly different, however all in-browser developer toolbars essentially make the same information available.
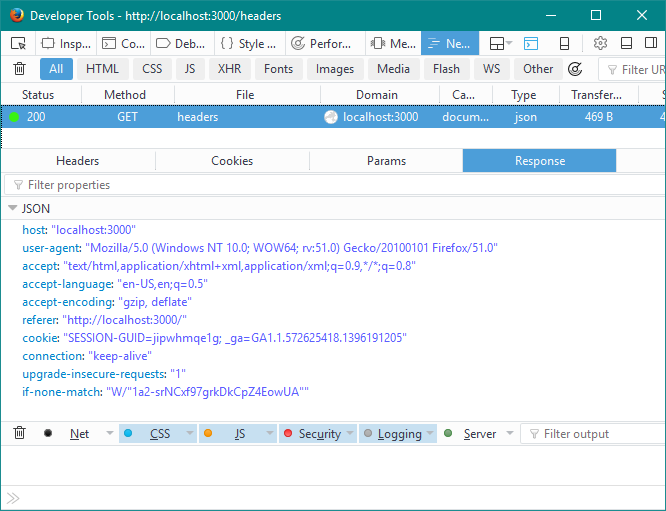
The network tab in the dev tools is one of the core tools for debugging on the client side. You can check the returned status code, see all the api requests being made, filter by just XHR requests, examine the cookies involved in the request and response, see request and response headers, and examine the data returned from a request.
Publishing Our Code (Vercel Guide)
As a final task for this week, follow along with the “Getting Started With Vercel” Guide. This will allow us to place our code online and create web applications that are accessible on the Web.