![]()
WEB700
Web Programming Foundations
Schedule Notes Resources Graded Work MyApps Instructions Vercel Guide Code examplesGetting Started with Cyclic
![]()
The main server environment that we will be using in WEB322 is Cyclic. From their website:
CYCLIC IS SERVERLESS
There are no servers, no containers, no images, no hours to count. Each app is deployed entirely on serverless cloud infrastructure.
No Sleep: Even with free tier. Apps do not have to sleep, wake up, spin up or recycle. All front-ends and back-ends are ready on-demand, immediately and at all times.
No Overload: Containers make traffic a constant concern because resources are shared across concurrent requests.
On Cyclic, serverless functions are allocated to each individual request on demand, making it possible for your apps to hyper scale.
HYPER SCALE
On Cyclic free tier, an individual 1GB RAM compute instance handles each separate http request. For a single request, this is about ~2x cpu/memory compared to popular container platforms. In a 10 concurrent request scenario, this comparison results in ~200x or 100GB RAM available system compute - on free tier!
Essentially, Cyclic manages the hardware infrastructure and deployment tasks for our node.js applications in a remote environment. Apps deployed using Cyclic are built and deployed into AWS where a serverless app is pre-provisioned using cloudformation.
To get started, developers push their code to GitHub and Cyclic does the rest. Additionally, Cyclic provides a range of projects as starters. These can be used to get started quickly or can be used as reference implementations to see how a particular framework can be deployed effectively.
The best thing - getting started is free! - This is where we come in:
Required Software
-
By now, you should have Node.js (available here) and Visual Studio Code (available here). However we will also need git
-
To download git, proceed to this download page and download git for your operating system.
-
Proceed to install git with the default settings. Once this is complete, you can verify that it is installed correctly by opening a command prompt / terminal and issuing the command git --version. This should output something like: git version 2.37.2 ( … ). If it does not output the installed version of git, then something is wrong and it is not installed correctly.
-
Lastly, for Cyclic to gain access to our code, we must eventually place it on GitHub. Therefore, you must also have account on GitHub before proceeding.
Creating Your First App on Cyclic!
-
Now that everything is downloaded / installed and we have confirmed that we have an account on GitHub, we can create our first Node.js app on Cyclic!. To begin, create a directory called helloworld on your local machine.
-
Open Visual Studio Code and Open your “helloworld” folder by clicking on the “Explorer” icon in the top left (it looks like two files) to expand the left “Explorer” pane. You should see an “Open Folder” button - click this and select to your newly created “helloworld” folder.
-
You should now see an empty “HELLOWORLD” folder in the sidebar.
-
The first step is to create your server.js file in your helloworld folder either by right-clicking underneath HELLOWORLD in the Explorer pane and choosing “new file”, or by clicking the new file icon next to HELLOWORLD. Name this file server.js
-
Next, to begin building our app within this folder we have to issue a few commands in Visual Studio Code’s “integrated terminal”. To open this use the keyboard shortcut (ctrl +
`) or select “View” -> “integrated terminal” from the top menu. -
In the (now visible) integrated terminal, type the command npm init and enter the following information:
- Press enter for name (use the default)
- Press enter for version (use the default)
- Press enter for description (use the default)
- Press enter for entry point (use the default)
- Press enter for test command (use the default)
- Press enter for git repository (use the default)
- Press enter for keywords (use the default)
- Type your own name for author:
- Press enter for license: (use the default)
- and finally, press enter to accept your entries as ok
-
This will create a package.json file under your helloworld folder. This will help us manage our dependencies later on and is always the first step creating node.js applications.
-
Next, we must retrieve the express module using npm. Execute the following command from within the terminal: npm install express - this will create a node_modules folder with our new express module as well as update our package.json file with our dependency!
-
You should now be editing your server.js file. Enter the following code:
var HTTP_PORT = process.env.PORT || 8080;
var express = require("express");
var app = express();

// setup a 'route' to listen on the default url path
app.get("/", (req, res) => {
    res.send("Hello World!");
});

// setup http server to listen on HTTP_PORT
app.listen(HTTP_PORT);
Be sure to save your file before moving on.
-
Next, create a file called .gitignore containing the text:
node_modulesThis will ensure that the node_modules folder does not get included in your local git repository
-
Finally, issue the following command from the integrated terminal: git init - this will initialize a local git repository in your helloworld folder. You will notice that an icon in the left bar now has a blue icon showing a number. This represents all of the files that must be added to our local git repo.
Click the icon in the left bar and type “initial commit” for the message in the “Message” box. Once this is done, click the checkmark above the message box to commit your changes.
NOTE: If, at this point, you receive the error: “Git: Failed to execute git”, try executing the following commands in the integrated terminal:
git config --global user.email "you@example.com"
git config --global user.name "Your Name"
Once this is complete, attempt to click the checkmark again to commit your changes.
Create a GitHub Repository
For Cyclic to gain access to our code, we must place it on GitHub. Therefore, the next step in this process is creating a GitHub repository for your code:
-
Sign in to your GitHub account.
-
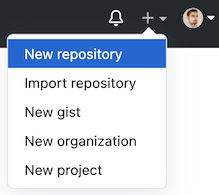
Find and click a “+” button on the Navigation Bar. Then, choose “New Repository” from the dropdown menu.
-
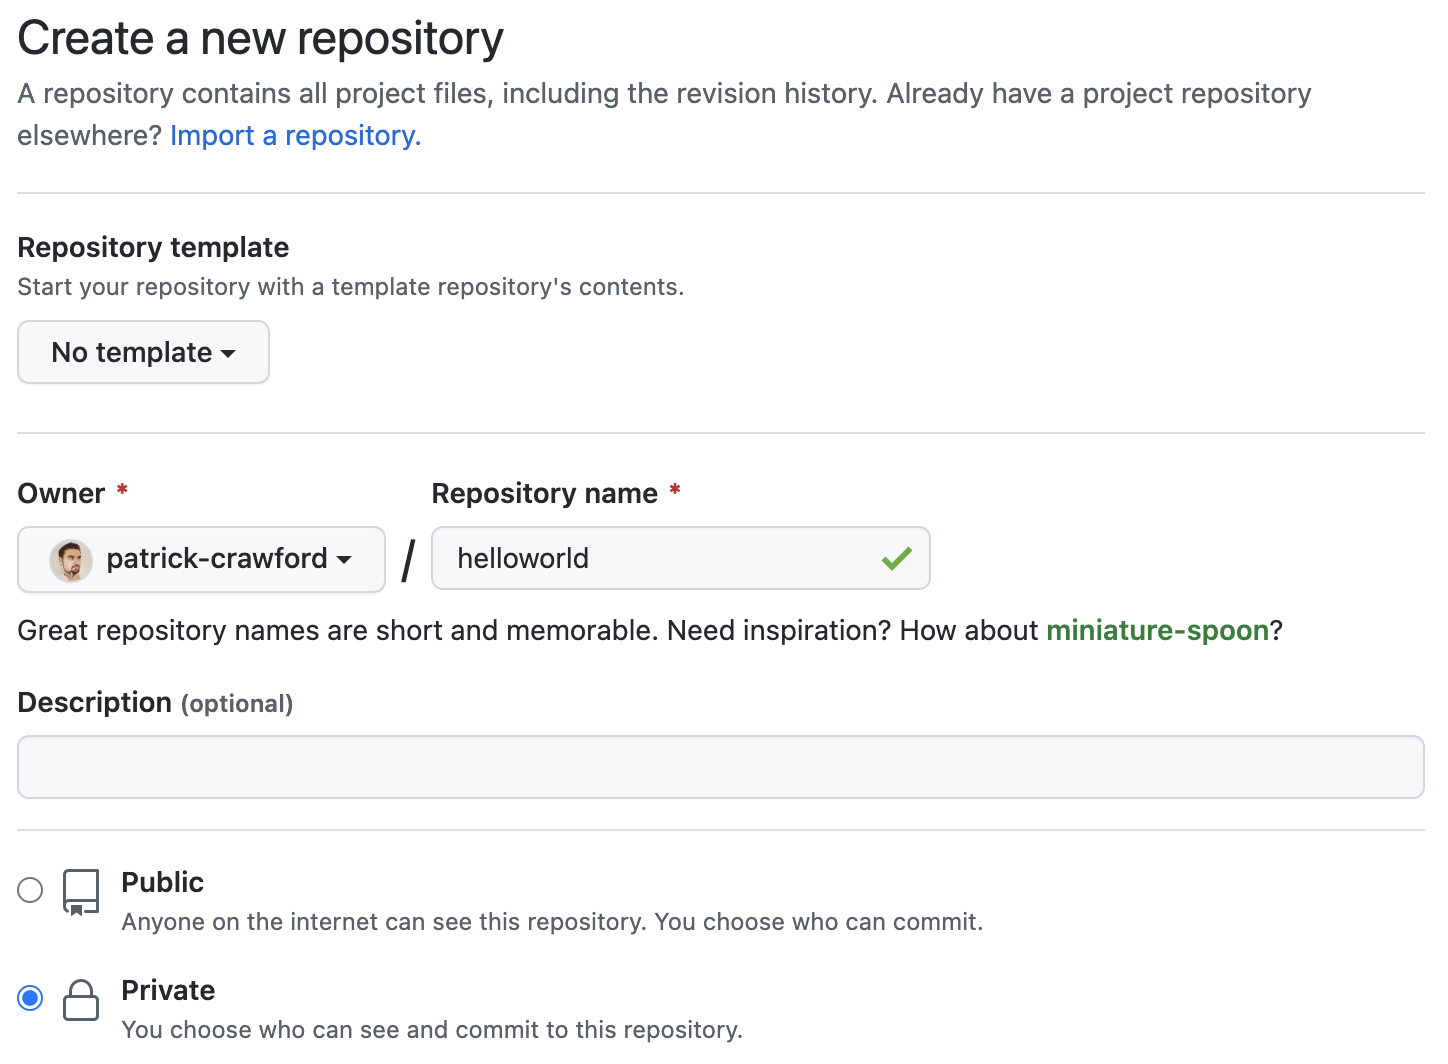
Fill in the repository name text field with the name of your project. Also, please make sure that the “Private” option is selected:
-
Once you’re happy with the settings, hit the “Create repository” button.
Connect the Local Git Repository to GitHub
Now that our GitHub repository is created, we can proceed to update it with our local copy:
-
First, go to your newly-created GitHub repository and click the “copy” button in the “Quick Setup” block:
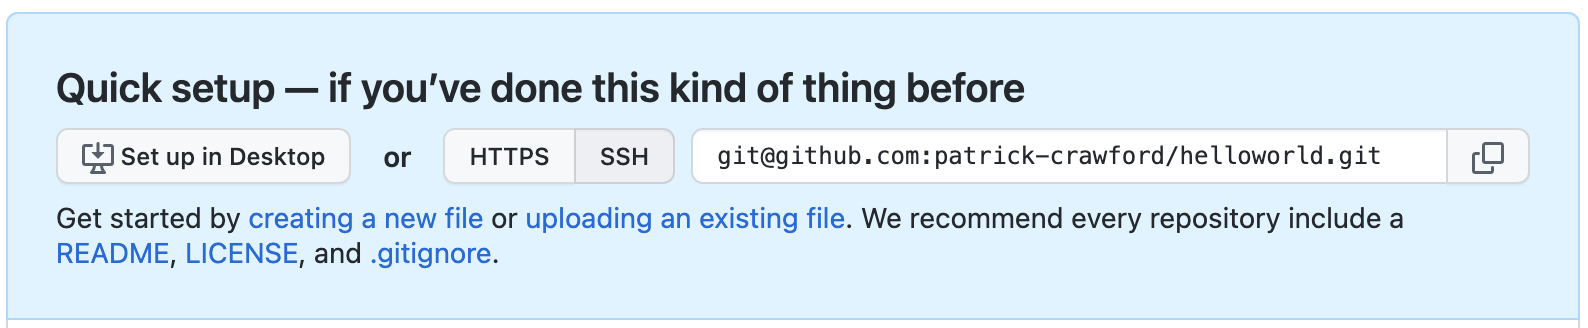
This will copy the URL of your remote GitHub repository.
-
Next, go back to your Terminal again and add this remote URL by running the following command:
git remote add origin URLwhere URL is the remote repository URL that you have copied in the previous step.
-
To confirm that “origin” was added correctly, run the command:
git remote -v. You should see something like this:origin git@github.com:patrick-crawford/helloworld.git (fetch) origin git@github.com:patrick-crawford/helloworld.git (push) -
Finally, you can push the code from your local repository to the remote one using the command:
git push origin masterImportant Note: If at this point, you see the error: “src refspec master does not match any” then “master” is not set as your default branch. Execute the command
git statusto determine which branch you’re on (it may be “main”) and push that instead, ie:git push origin main, for example
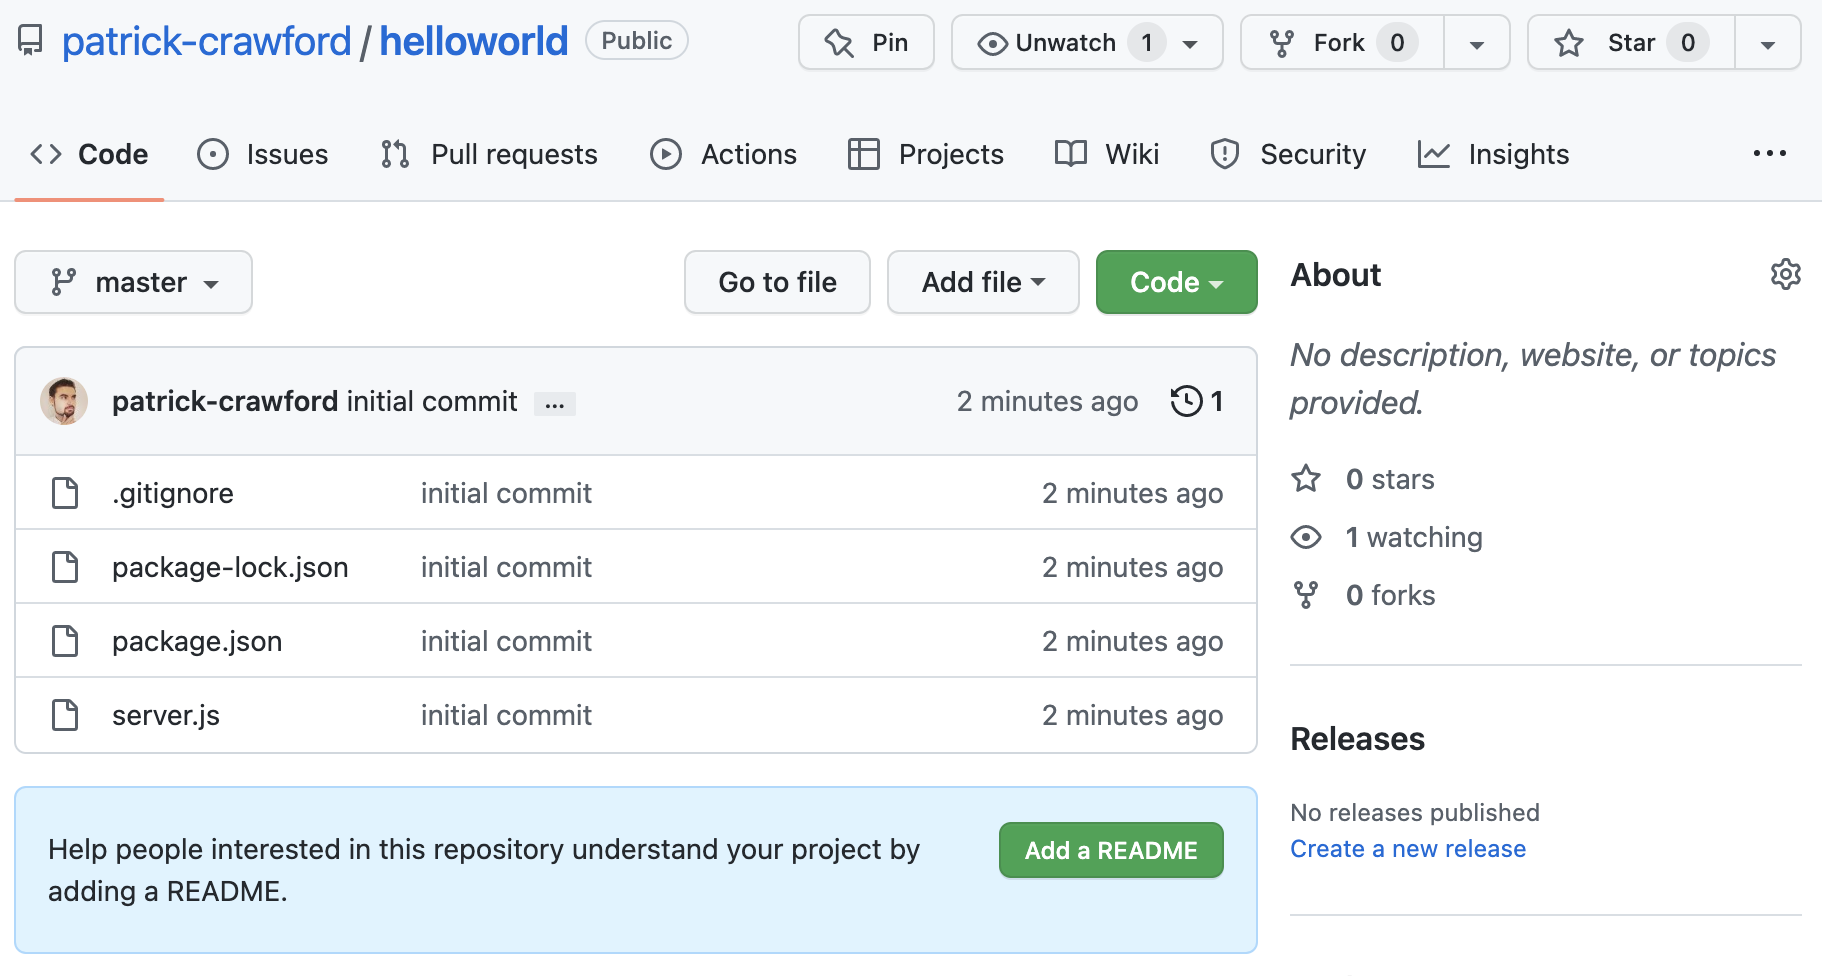
You can verify that the code was pushed by going back to your Browser and opening your GitHub repository.
Connect the GitHub Repository to Cyclic
With our code finally online, we can sign into Cyclic and give it access to our code. To proceed:
-
Navigate to https://www.cyclic.sh
-
Click the large blue DEPLOY A STARTER NOW! button beneath the “Full Stack Apps” header text.
-
Click the “Continue with GitHub” button to sign in using your GitHub account
-
Once you have logged in, click the green “Deploy” button in the “Create a New App” section:

-
At the top of the page, switch to the “Link Your Own” tab and begin typing the name of the your private GitHub repository hosting your code (in this case “helloworld”)
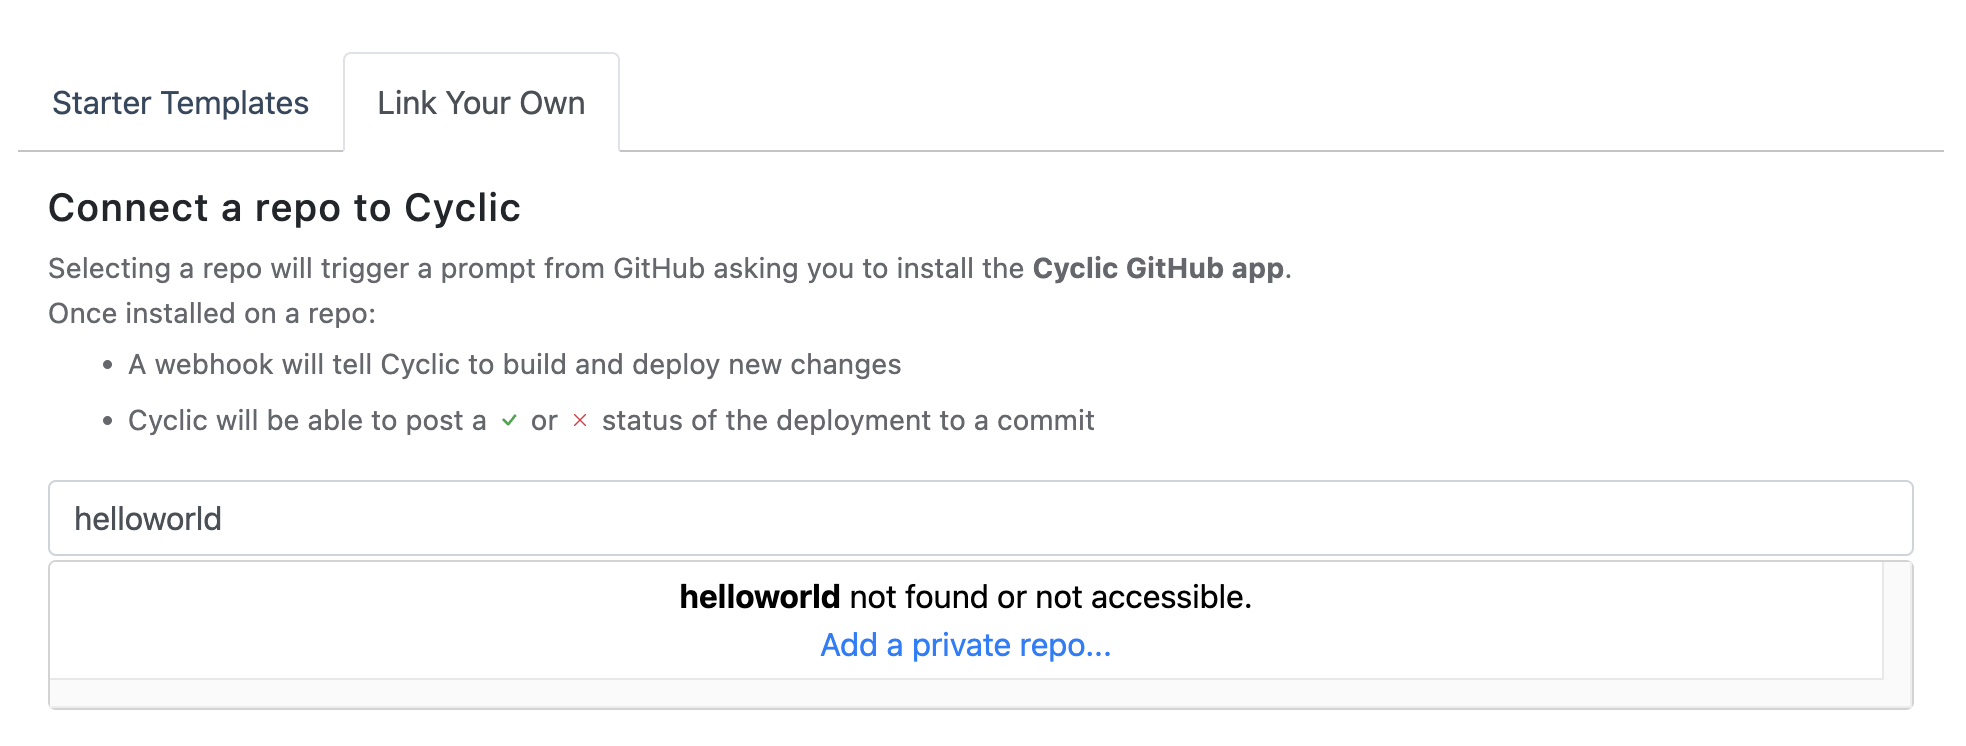
-
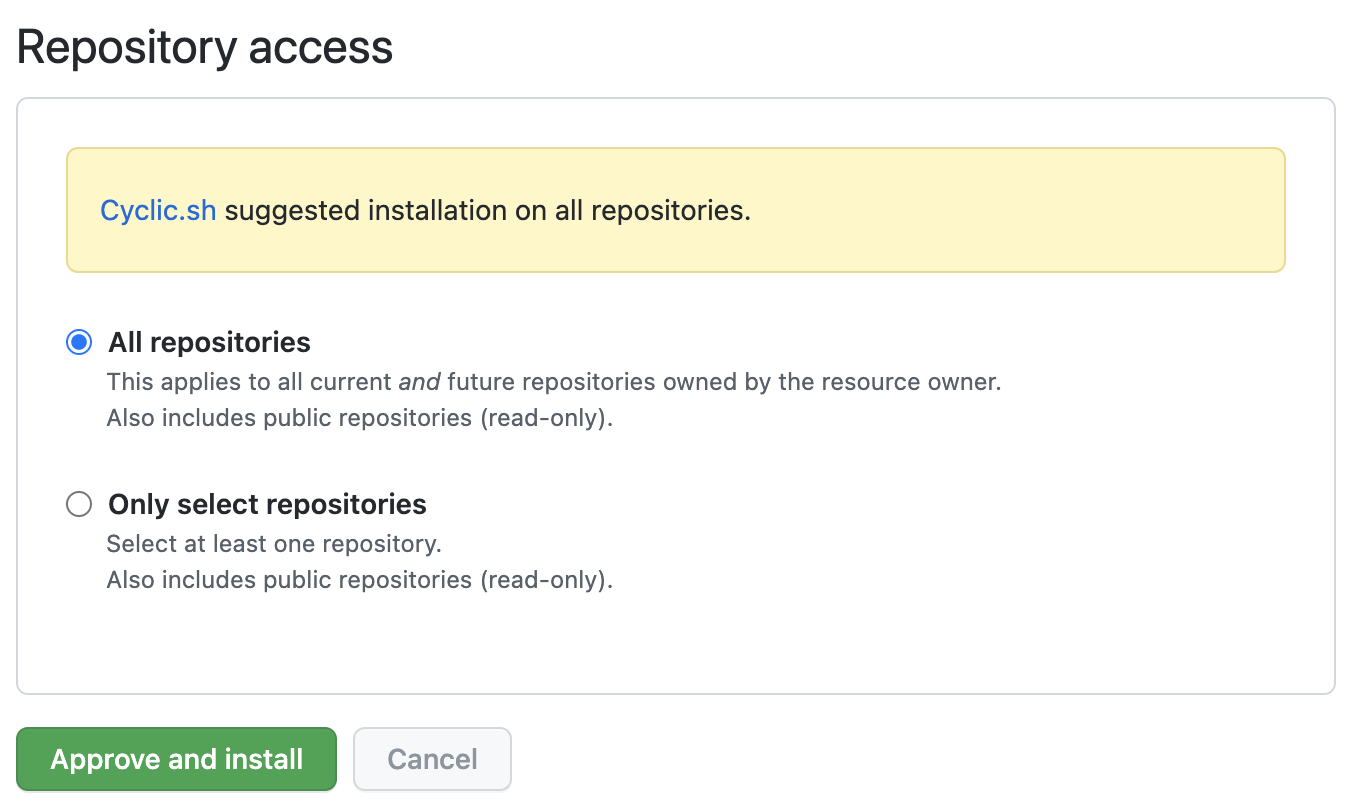
You will see that the repository is not found (this is because it is ‘private’) - proceed to click the “Add a private repo…”. This will open a new window to configure GitHub for Cyclic. You can leave “all repositories” selected and click “Approve and install”
-
Select your newly added repository from the list and click the “Connect” button
-
Confirm access to the repository by once again entering your GitHub password
-
Your code will now take a moment to build. Once it’s complete, you should see some confetti and the text “You’re Live!” beneath the build log. From here you can an click the “Go to Dashboard” button to see information about your deployed app, including the generated link to view it live!
Make Changes and Push to GitHub
Finally, our code is linked to Cyclic via. GitHub!
You should now be able to make any changes you wish and trigger a redeploy of your server on Cyclic by simply making changes locally, checking in your code using git and “pushing” it to GitHub, using the above instructions.
Good luck and Happy Coding!